 |
| Style Arc Tootsie Top October's Freebie |
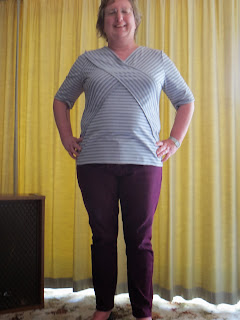
I am on a trouser making binge and ordered a few from Style Arc this month to continue the fitting nightmare journey. Accompanying the patterns was this months freebie and it looked very interesting - so interesting that I bought some fabric and made it!
The fabric was from the wonderful Fabric Shop (previously Designer Textiles in Otara) and is a cotton/lycra knit in a dainty shellpink/beige and black stripe. I have been consulting colour books again and the advice for one such as my colouring is to reduce the contrast between two colours that I wear. So I can wear black stripes as long as I mute the contrast such as this fabric.
I made the pattern up in my usual Size 20 and decided not to add any extra insurance on seams as the front looked like a rather complicated puzzle. Style Arc has provided pictures showing how to make up along with the written instructions but I found them hard to understand until I actually had the pieces in my hands to follow instructions.
The first difficulty was working out the way the front pieces went as my stripe had an up and down side - I ended up putting the lighter stripes upwards and the darker thicker stripe underneath. Cutting out after working this out was a breeze and very quick as only one layer was required.
The first step in making this top was to iron the tuck allowances (which then form the neck line and fold over the seams). I decided this was an excellent time to use the Babylock chainstitch on the Coverseamer and resulted in beautiful joins of the front pieces with no rippling or stretching. I highly recommend using this stitch for this top if you have it.
Somehow I think I have made an error as the diagonal stripe piece ends higher up the armhole that is drawn on the pattern - also it slightly screws upward across the bust. After assembling the front it was an easy and quick matter to finish the rest (although in my case my overlocker decided to eat the fabric of one shoulder which meant that I spent lots of time unpicking and the neckline might be a little higher than on the pattern).
My daughter, the photographer, said it looked great on me (she is not one for false praise) but I am not so sure. Firstly it feels a little tight and you can see it pulling across the bust (D cup here). Were I to make it again I would add more to the side seams (now I know where they are) and perhaps lower the neckline a little. The pattern itself is well drafted and went together without problems (operator error is responsible for the higher neckline as above) once I had the pieces cut out.
Does anyone else read instructions completely before beginning a project? I do and the odd time I don't ( see the Style Arc Heidi Cardigan edge problem) always ends in tears, but I have problems with both Style Arc and Burda instructions understanding as I guess they are very brief and understanding does not occur until I actually have the garment pieces in hand and working through the instructions.
I have yet to hem the sleeves and bottom but will finish this top only so I can pass it on - The Bernina Club ladies are always interested in a new piece of clothing! I bought 2 metres of fabric for this but only used less than a metre - I think the generous measuring of the sales assistant means that there is more than enough for another top. So if you think you would like to try this top I am giving away the pattern and the rest of the fabric - to ensure that it is morally correct I issue a disclaimer that I have not made a copy as I do not intend making this pattern again.
Please comment if you would like to receive this pattern along with the remaining fabric and I will make the draw next weekend.


